
V2 T238 Digital Trigger Unit V2.0 Bluetooth Version

Warning:
This upgrade kit is designed for professional AIRSOFT/gel ball blaster player who can fully disassemble and assemble Automatic Electric Gun. The compatibility with all Gearboxes is not guaranteed, but it can fit into standard or common brand Gearboxes V2 without larger modification. Related Tools and skills is needed for installing the product.
Attention:
- Shim the gearbox before installation.
- Protect the detection sensors while installing, keep the sensors clean, make sure that nothing is blocking the sensors.
- Mind the positive and negative of the motor, do not reverse.
- The DTUwill not work correctly before the motor is installed with the gear
Description:
T238 digital trigger unit Bluetooth version is a programmable MOSFET which can be programmed by smart phone via Bluetooth, it is specially designed for AIRSOFT and gel ball version Gearbox V2. With high speed processor, 8 optical sensors and 2 high power MOSFET chips, this system has many individualized programmable functions, such as piston positioning, binary trigger, multiple-shot and so on. Besides, it also has the functions of battery low-voltage protection and gearbox block-up protection. It can effectively improve the stability, shooting speed and response speed of gearbox, at the same time, it can completely eliminate the problem of gearbox single-shot become multiple-shot. The module uses a maximum of 12.6V batteries. Soldering and wiring are required.
Main parameters:
- Size: 45*30*14mm
- Operating voltage: 7.4-1V
- Integrated Bluetooth wireless communication module
- Programming via Bluetooth using smart phones
- Free APP for Android
- Active break tech & Piston reset
- Programmable auto-loading function
- Multiple programmable shooting mode
- Overheat protection
- Maximum Inrush current is 240A, Maximum Brake current is 100A
- Compatible with various Standard Gearbox V2
- Pre-cocking control
- Rate of fire control
- Sensors monitor
- DTU current, voltage and temperature report
- Total shot count and power-on time count

Functions:
- Low battery voltage protection, the default setting is protectionOFF. Change the battery when hearing ‘4~3~2~1’ 4 beeps low voltage warning sound.
- Block-up protection. When gearboxBlock-up occurs, the system stops working and emits an elongated ‘1~’ beep. Please check the gearbox immediately by power off.
- Auto-loading function is designed for gel ball blaster magazines with motor inside, when changing the magazine, the magazine motor will run automatically for a period of time, and the length of time can be programmed by 9th option.
- This module is able to increase rate of fire, the stability of single-shot and make batteries have higher durability.
- The energy that support the active brake function comes from the inertia of motor, stop the piston without delay. The effect of active brake is significant on high torque motor
- The active function prevents the over-spin of gears, this solve the issue that the single shot becomes multiple shot under high voltage. Meanwhile, the spring is fully released in semi-auto modeand parts in gearbox are not under strain, increase the life cycle of gearbox and parts.
- The system includes multiple shooting mode, these modes can be selected by fire select switch
- The default position of the piston is adjustable in semi-auto mode. Pre-cocking function can be implementing, zero trigger delay
- Adjustable rate of fire, the gap between two single shots can be programmable, to achieve adjustable rate of fire
- When the DTU is overheated, after the trigger is pulled, the motor will give a beep prompt until it is automatically restarted after cooling.
Modes:
SAFE:This mode is completely the same as original safe mode. The trigger can be pull but nothing happens. This mode can be programmed to semi-auto, double stroke single shot, 3-round burst to 6-round burst, the default mode is safe mode
SEMI: This mode can be programmed to semi-auto, double stroke single shot, 3-round burst to 6-round burst, the default mode is semi auto
AUTO: This mode can be programmed to full-auto, 3-round burst, 6-round burst and 9-round burst, the default mode is Full-auto
Sensors:


Receiving sensors: 5 trigger receiving sensors, 1 gear receiving sensor, 1 semi-auto sensor and 1 full-auto sensor.
Transmitting sensors: 1 trigger transmitting sensor, 1 gear transmitting sensor and 1 selector transmitting sensor.
How does it works:
The transmitting sensors emit light of a specific frequency, and the receiving sensors change the output signal when it receives it. The DTU reacts according to the signal of the receiving sensors. Sunlight and some lights contain light of that specific frequency, be careful to avoid interference and keep the sensors clean.
Gear sensors: When installed correctly, the gear transmitting sensor and the gear receiving sensor are located on both sides of the sector gear. When the sector gear rotates to a specific position, the gear receiving sensor will be blocked, so that the gear receiving sensor can not receive the signal from the gear transmitting sensor. The DTU detects the angle of the sector gear according to the output signal of the gear receiving sensor.
Trigger sensor: When installed correctly, the trigger transmitting sensor and the trigger receiving sensors are located on both sides of the trigger. When the trigger is fully released, the trigger receiving sensors will be blocked, so that the trigger receiving sensors can not receive the optical signal from the trigger transmitting sensor. When the trigger is pressed, the trigger will no longer block the trigger receiving sensors, and the trigger receiving sensors can normally receive the signal from the trigger transmitting sensor. The DTU detects the angle of the trigger according to the output signal of the trigger receiving sensors.
Selector sensors: Selector sensors need white sticker on selector plate to work correctly, When installed correctly, the optical signal emitted by the selector transmitting sensor is reflected by the white sticker and received by the semi-auto and full auto sensors. The distance between the white sticker surface and the sensors cannot be greater than 2mm and less than 0.5mm.

- When the selector plate in the SAFE position, the white sticker reflect nothing, the semi-auto sensor and full-auto sensor can not receive the optical signal.
- When the selector plate in the SEMI-AUTO position, the optical signal from the transmitting sensor is reflected by the white sticker and received by the semi-auto sensor, but the full-auto sensor can not receive the optical signal.
- When the selector plate in the FULL-AUTO position, the optical signal from the transmitting sensor is reflected by the white sticker and received by both the semi-auto sensor and the full-auto sensor.
The DTU detects the position of the selector according to the output signal of the semi-auto and full-auto sensors.
Requirements:
- High-power soldering iron (higher than 50W) is recommended, solder the clop with 0.5sqm soldering wire and soldering rosin. Please ask professional for help if you do not know to solder.
- Please use Spring smaller than M150.
- Use high torque motor(no load current less than 3A)can stop the motor faster and prevent DTU from overheating.
- In standby state, the current of the system is smaller than 0.05 Please disconnect the battery if it is not used for a long time.

Installation:
- Shim the gears before installation to avoid damaging the gear sensor.
- Disassemble the gearbox, it is necessary to take off the cut-off leverand the Safety lever, keep selector plate on the gearbox (Tutorial for disassemble gearbox can be found on YouTube).
- Paste the attached insulation sticker in the corresponding position on the circuit board surface.
- If it's not a gel ball gearbox, you can removetwo power lines for the magazine.
- Install the module and push the wires in the gearbox (some gearbox needs to be cut off stiffener or drilled hole)
- Assemble the gearbox.
APP for Android:

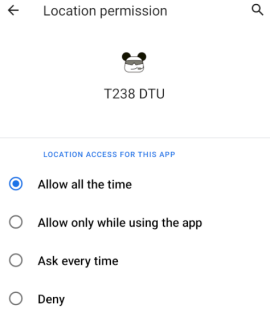
Download and install the. APK file from the website: https://t238.net/download. After installation, enter the settings -> APP¬ification, find the “T238DTU”, go to APP permissions -> location permission, and select “Allow all the time”. This will allow the smart phone APP to fine the Bluetooth devices.
Bluetooth:
Bluetooth programming function will be turned off in 30 seconds after power on. Connecting DTU with smart phone needs to be completed within 30 seconds after power on, otherwise, the DTU needs to be powered off and powered on again.
Open the app, click “Search” button to find the Bluetooth device "T238DTU" and connect it.


Trigger calibration:
There are five trigger sensors, which are convenient to adapt to different trigger rotation angles. When using DTU for the first time, trigger calibration is required. The specific operation is as follows: install the gearbox, grip and motor, connect the battery, when the prompt tone “1~2~3~3~2~1~” is heard, hold the trigger, and then release it. After repeating three times, the prompt tone “1~2~3~” will be heard, indicating that the DTU has been calibrated. The trigger rotation angle of different gearboxes is different, so it needs to be recalibrated when replacing gearbox or trigger. To recalibrate the trigger, connect the app and restore the DTU to the factory settings. Restore factory settings is in the “Module parameter set”.
Sensors monitor:
Open the app, click “Search” button to find the Bluetooth device "T238DTU" and connect it.


Go to “DTU Sensors Monitor”, and enable the “Enable monitoring” checkbox, move the trigger, selector plate and the sector gear to see if the corresponding checkbox changes. If no, means that the corresponding position sensor is faulty or the installation is faulty, and the corresponding sensor cannot be triggered. It is suggested to open the gearbox for investigation.
Programming:
- Basic setting


Reset: reset the basic settings to the default settings.
Load: load basic settings from DTU.
|
Option\Parameter |
1 |
2 |
3 |
4 |
5 |
6 |
7 |
|
1 Low power warning |
Disable |
7.4V |
11.1V |
9.6V |
|
|
|
|
2 Safe mode |
Safe |
Semi-auto |
Binary trigger |
3 round bursts |
4 round bursts |
5 round bursts |
6 round bursts |
|
3 SEMI mode |
Semi |
Binary trigger |
3 round bursts |
4 round bursts |
5 round bursts |
6 round bursts |
|
|
4 Auto mode |
Auto |
Semi |
3 round bursts |
4 round bursts |
5 round bursts |
6 round bursts |
|
5 Firing interval |
Disable |
0.5s |
1s |
1.5s |
2s |
2.5s |
3s |
|
6 Trigger mode |
Normal |
Sensitive |
AUG Fire Mode:Light press semi-auto and heavy press full-auto |
|
|||
|
7 Selector type |
G36 |
AK47 |
|
|
|
|
|
|
8 Auto-loading time (Gel ball only) |
3S |
2.5S |
2S |
1.5S |
1S |
0.5S
|
Disable |
|
9 Sector Gear |
Non DSG |
DSG |
|
|
|
|
|
2.Advanced setting

Reset: reset the advanced settings to the default settings.
Load: load advanced settings from DTU.
|
Option |
0 |
1~255 |
|
1 Pre-cocking control |
Disable |
Add some delay time before braking in order to control the stop position of the piston. The parameters need to be adjusted according to the actual situation, 0 ~ 255 can be adjusted. |
|
2 Rate of fire control |
Disable |
The delay time between two single shots can be programmable, to achieve adjustable rate of fire. 0~255ms can be adjusted. |
|
3 Active braking control |
Disable |
Adjust this parameter in order to control the brake strength. Properly reducing the brake strength can alleviate the motor heating and reduce the motor carbon brush wear |
|
4 Electronic fuse |
|
The adjustable range is 15 ~ 100A. When the working current exceeds the set value, the DTU will interrupt the work and give a warning beep. |
|
5 Magazine Capacity Limit
|
Disable |
The maximum capacity of the magazine can be set. When the firing shots are equal to the maximum load of the magazine, the DTU will wait for 2 seconds to simulate the operation of changing the magazine. |

Shot Counter: count the number of shots of gearbox.
Power-up Time: count the power on time of gearbox.
Average Rate of Fire: calculate the average rate of fire in fully automatic firing state.
4.Sensor Monitor
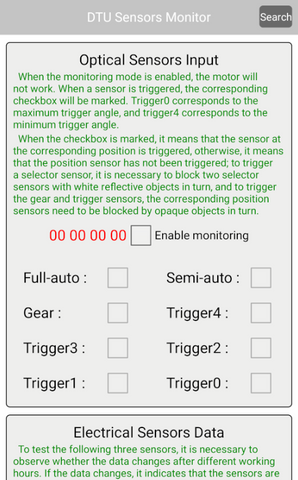

Optical Sensors Input: trigger sensors0~4, gear sensor, semi-auto sensor, full-auto sensor.
Electrical Sensors: voltage sensor, current sensor, temperature sensor.
Magazine port: this port is designed to detect the connection of gel ball magazine.
5.Extended ports: not yet developed.


Refresh: refresh the report data.
Input Voltage: current input voltage.
Max Input Voltage: historical maximum input voltage.
Min Input Voltage: historical minimum input voltage.
Motor Start Current: average starting peak current of motor during the last operation.
Average Semi-auto Current: average motor current during the last Semi-auto operation.
Average Full-auto Current: average motor current during the last Full-auto operation.
MOSFET Temperature: current temperature of MOSFET.
Max MOSFET Temperature: historical maximum temperature of MOSFET.
Min MOSFET Temperature: historical minimum temperature of MOSFET.
6.Battery Charge Report

Type: the supported battery types are Li-Fe and Li-Po.
Voltage: the supported voltage range is 2.5~12.6V.
Power: percentage of remaining electricity
Acquisition power: refresh the displayed data
7.Device Information

8.Module Parameter Set

9.GPS Locate

10.Command Terminal


APP & TUTORIAL
T238.NET
1 komentář
Hello. Lets do “empty magazine notification” for airsoft. You can use magazine capacity limit. Every X shots do “beep” and reload shotmeter. Also reload shotmeter may be released through reloading magazine, that control by auto loading time function (with minimal upgraded airsoft magazines).